Hello 🙂
In this post I will describe how to prepare solid vpn gateway which works flawlessly with many different clients.
I choose the solution based on modern IKEv2 protocol created with Microsoft and Cisco together. In a big simplification – IKEv2 (Internet Key Exchange version 2) is responsible to set up a security association (SA) in the IPsec protocol suite.
Advantages of IKEv2 over IKEv1 protocol:
- it tolerates interruptions, latency etc. on network connection. For example, if the connection is temporarily lost, or if a user moves a client computer from one network to another, IKEv2 automatically restores the VPN after the network connection is reestablished — in transparent way to the user.
- EAP authentication – we can authenticate simply, by username and password
- better dead peer/tunnel detection
- consume less bandwidth
IKEv2 has built in client in Windows 7 and newer and on macOS and iOS systems.
For Android there is a StrongSwan client app which is working very well. In Linux we can simply use Strongswan which is one of IPsec implementation for Linux.
I will skip the part describing an obtaining a certificate from Let’s Encrypt. It is well documented in internet.
For server/gateway side I used Strongswan which provides support for IKEv2.
Server configuration
For setup server side we have to:
Install Strongswan:
(I’m installing it on OpenSUSE)
|
1 |
zypper install strongswan |
or if you using Debian based Linux distribution
|
1 |
apt-get install strongswan |
I already have a certificate Let’s Encrypt for my domain. The typical catalog structure with the certificates from Let’s Encrypt looks as follows:
|
1 2 3 4 5 6 |
router:~ # ls -l /etc/certbot/live/taczanowski.net/ lrwxrwxrwx 1 root root 39 01-10 00:22 cert.pem -> ../../archive/taczanowski.net/cert2.pem lrwxrwxrwx 1 root root 40 01-10 00:22 chain.pem -> ../../archive/taczanowski.net/chain2.pem lrwxrwxrwx 1 root root 44 01-10 00:22 fullchain.pem -> ../../archive/taczanowski.net/fullchain2.pem lrwxrwxrwx 1 root root 42 01-10 00:22 privkey.pem -> ../../archive/taczanowski.net/privkey2.pem -rw-r--r-- 1 root root 543 11-10 18:23 README |
To use it in Strongswan it is necessary to create links to certificates and keys:
|
1 2 3 |
ln -s /etc/certbot/live/taczanowski.net/cert.pem /etc/ipsec.d/certs/cert.pem ln -s /etc/certbot/live/taczanowski.net/chain.pem /etc/ipsec.d/certs/chain.pem ln -s /etc/certbot/live/taczanowski.net/privkey.pem /etc/ipsec.d/private/privkey.pem |
W need to provide Let’s Encrypt intermediate certificate:
|
1 2 |
wget https://letsencrypt.org/certs/lets-encrypt-x3-cross-signed.pem -O \ /etc/ipsec.d/cacerts/lets-encrypt-x3-cross-signed.pem |
Now we can edit /etc/ipsec.conf
My configuration looks as follows:
|
1 2 3 4 5 6 7 8 9 10 11 12 13 14 15 16 17 18 19 20 21 22 23 24 25 26 27 28 29 30 31 32 33 34 35 |
router:~ # cat /etc/ipsec.conf # ipsec.conf - strongSwan IPsec configuration file # basic configuration config setup # strictcrlpolicy=yes # Allow for multiple connections form one account uniqueids = no charondebug = ike 3, cfg 3 conn IKEV2 auto=add dpdaction=clear dpddelay=60s rekey=no fragmentation=yes keyexchange=ikev2 # left - server configuration left=%any leftsubnet=0.0.0.0/0 #all client traffic is redirected through vpn gateway leftauth=pubkey leftcert=cert.pem leftsendcert=always leftid=taczanowski.net # right - client confguration right=%any rightsourceip=192.168.62.0/24 # pool of IPs which we providing for vpn clients rightauth=eap-mschapv2 # authenticate by username and password rightsendcert=never rightdns=8.8.8.8 # DNS server for clients rightid=%any eap_identity=%identity |
After that we have to add private key (/etc/ipsec.d/private/privkey.pem) and define usernames and passwords for vpn clients.
|
1 2 3 4 5 6 7 8 9 10 |
router:~ # cat /etc/ipsec.secrets # # ipsec.secrets # # This file holds the RSA private keys or the PSK preshared secrets for # the IKE/IPsec authentication. See the ipsec.secrets(5) manual page. # : RSA privkey.pem user1 : EAP "user1_password" user2 : EAP "user2_password" |
This is the whole Strongswan configuration. To apply configuration Strongswan must be restarted:
|
1 |
service strongswan restart |
If you want allow your clients access to the internet, you have to enable nat/masquerade
|
1 |
iptables -t nat -A POSTROUTING -s 192.168.62.0/24 -j MASQUERADE |
In some cases there is a problem with mtu/mss which can cause for example problem with opening some web pages. Strongswan documentation recommends reduce the MSS for packets transmitded through tunnel. Strongswan documentation
To reduce the mss, add a rule to iptables:
|
1 2 3 4 |
iptables -t mangle -A FORWARD -m policy --pol ipsec --dir in -p tcp -m tcp --tcp-flags SYN,RST SYN -m tcpmss --mss 1201:1536 \ -j TCPMSS --set-mss 1200 iptables -t mangle -A FORWARD -m policy --pol ipsec --dir out -p tcp -m tcp --tcp-flags SYN,RST SYN \ -m tcpmss --mss 1201:1536 -j TCPMSS --set-mss 1200 |
From my observations, reducing mss to 1200 ensures trouble-free operation on all clients
Clients configuration
In most clients it is trivial.
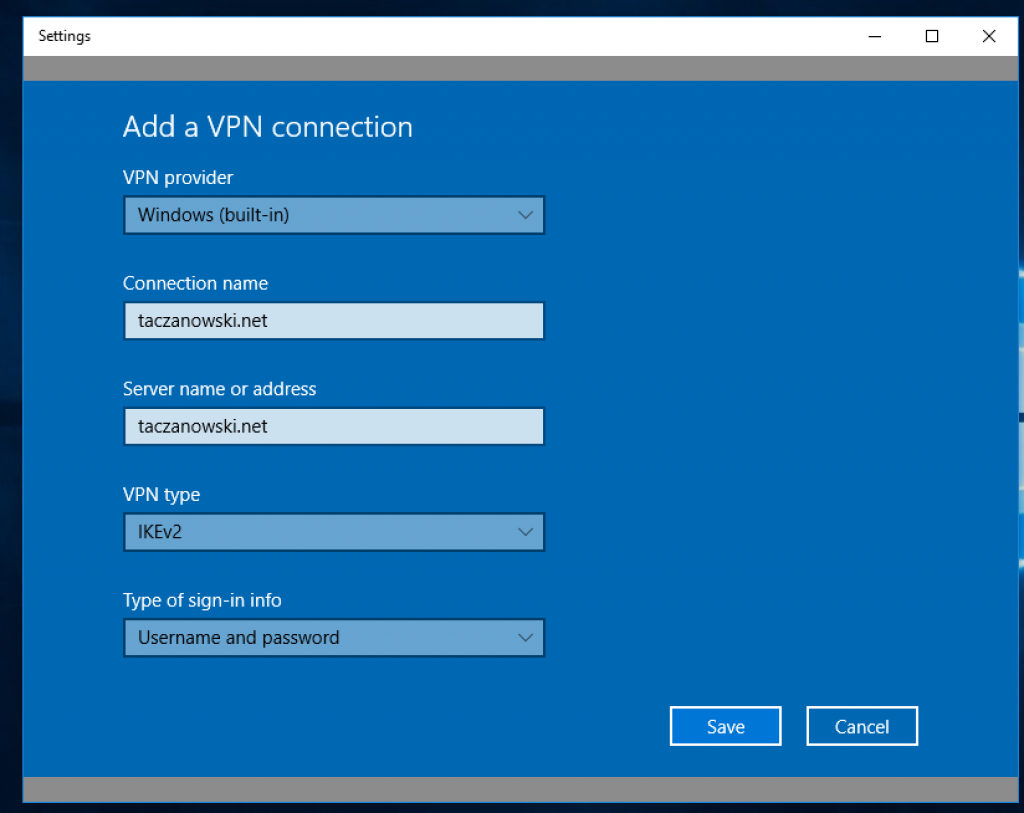
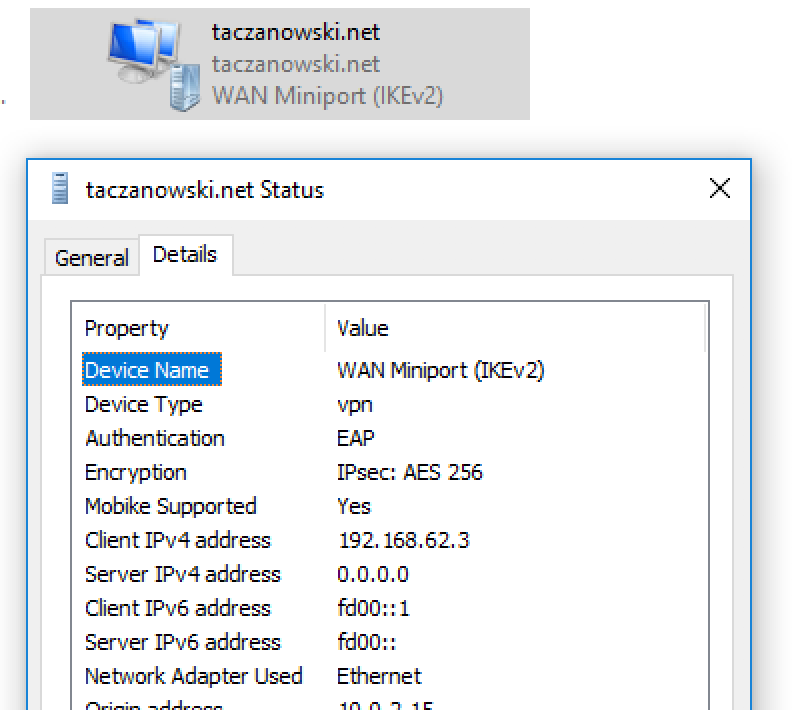
Windows
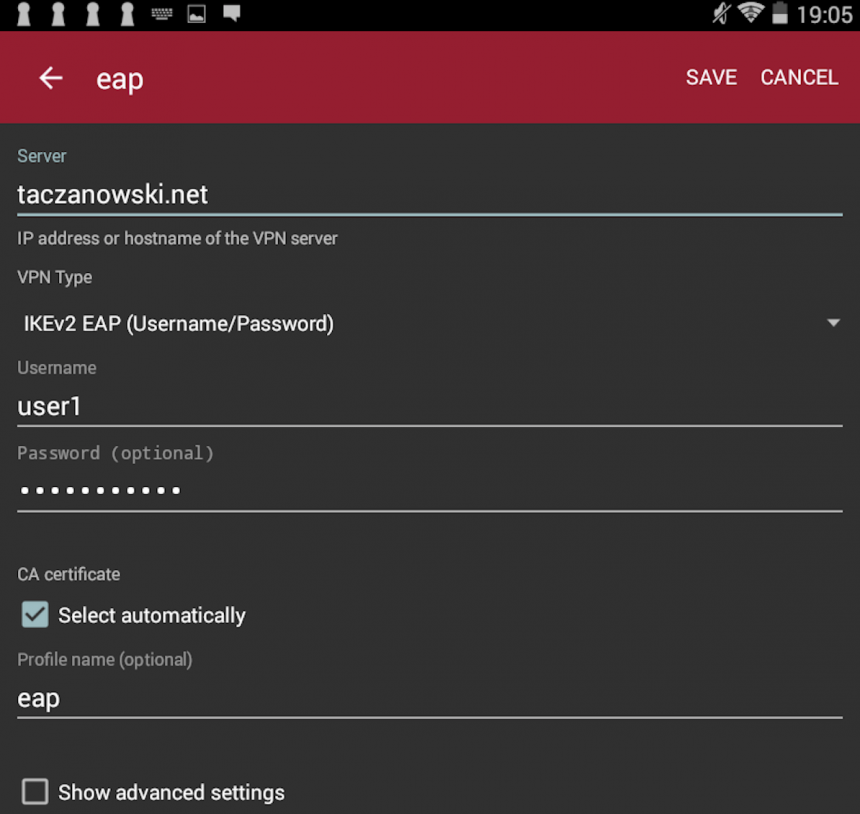
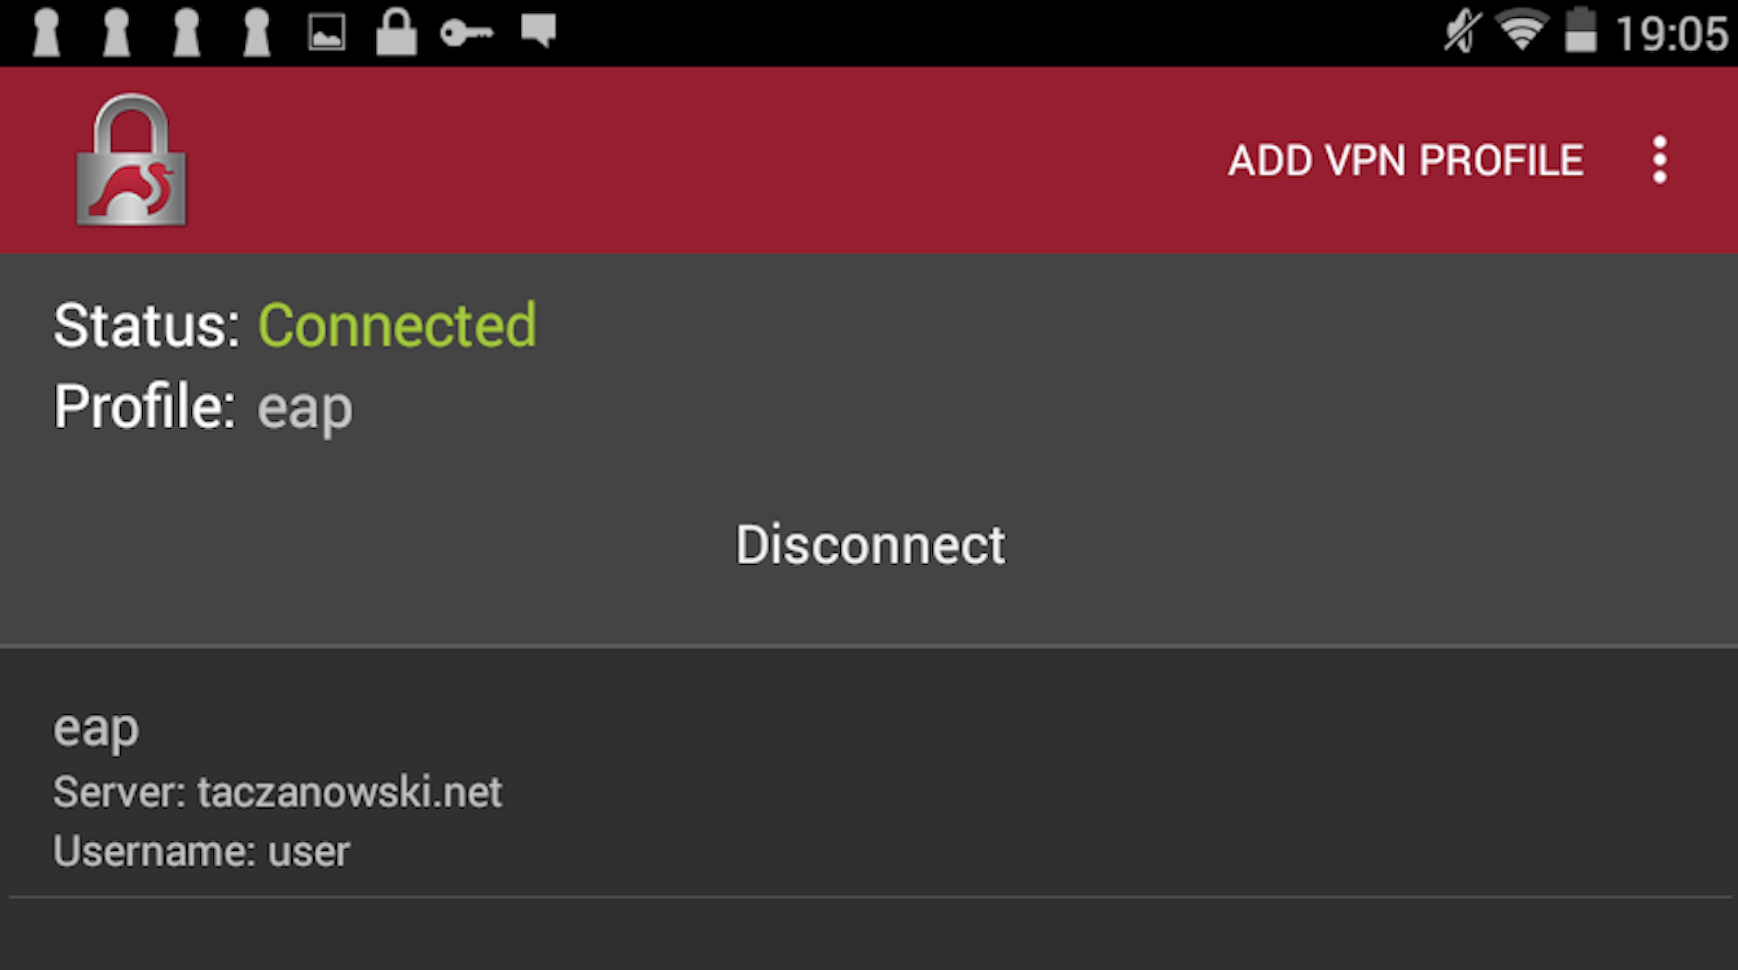
Android
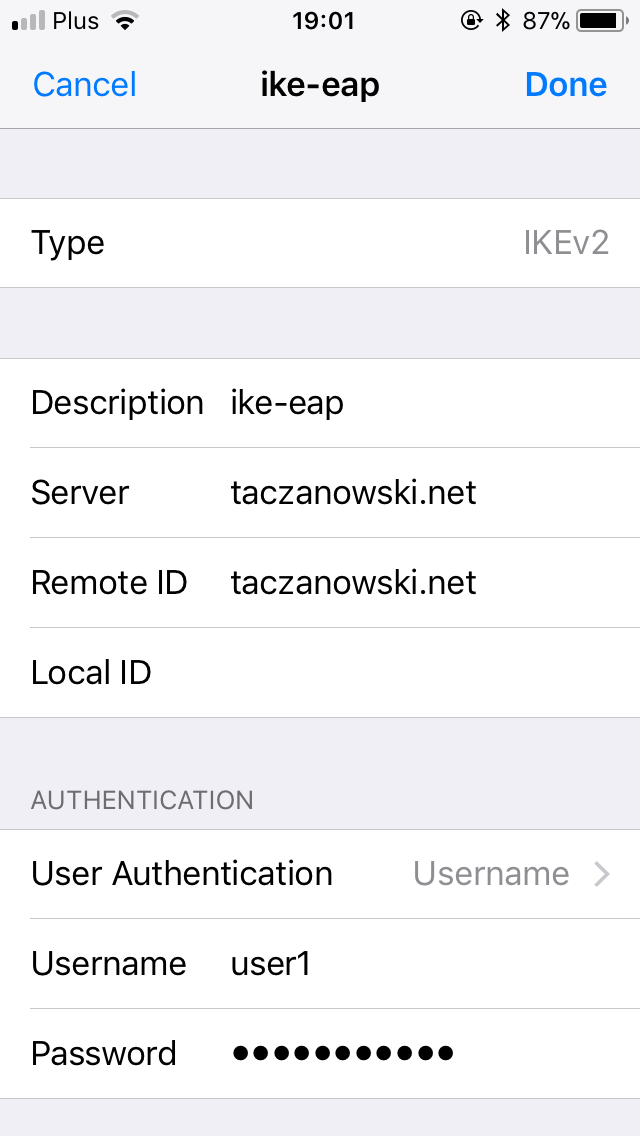
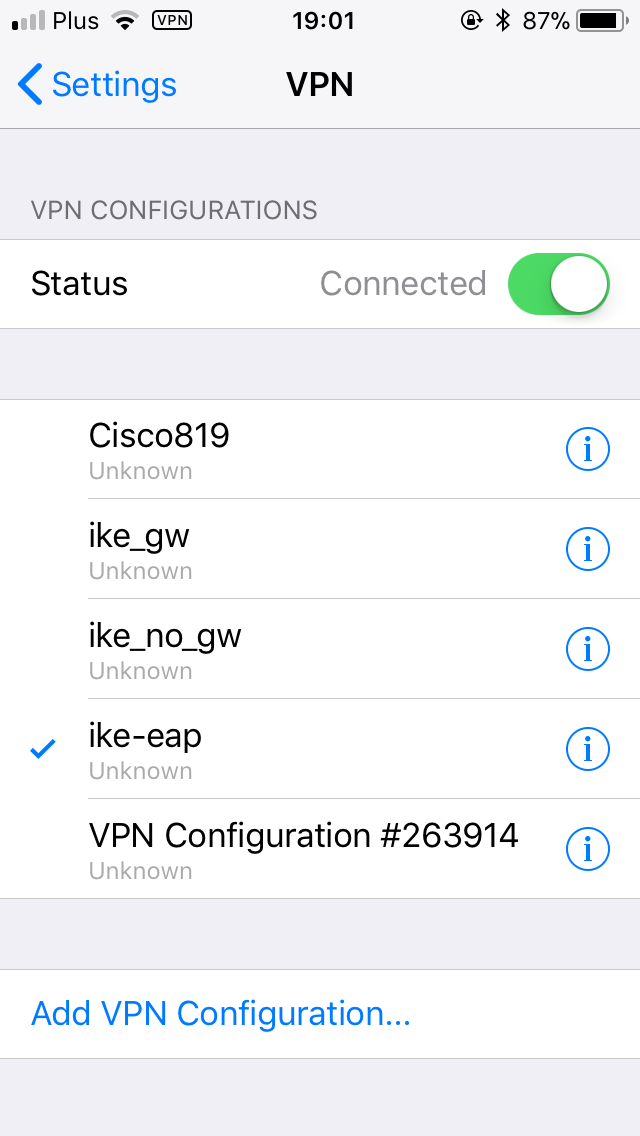
iPhone – iOS
macOS
Very simple configuration, analogous to iOS/iPhone
Linux
Unfortunately, manual configuration is slightly complicated. But then it works very well.
In newer releases of Linux distribution there is a gui plugin for network manager which provide easy configuration of vpn connection. But I haven’t tried it.
Strongswan configuration: /etc/ipsec.conf
|
1 2 3 4 5 6 7 8 9 10 11 12 13 14 15 16 17 18 |
x201:/etc/ipsec.d/cacerts # cat /etc/ipsec.conf # ipsec.conf - strongSwan IPsec configuration file config setup # strictcrlpolicy=yes # uniqueids = no conn ikev2 right=taczanowski.net rightid=%taczanowski.net rightsubnet=0.0.0.0/0 rightauth=pubkey leftsourceip=%config leftauth=eap leftdns=%config4 fragmentation=yes eap_identity=user1 auto=add |
password for user1 i stored in /etc/ipsec.secret:
|
1 2 3 4 5 6 7 8 |
x201:/etc/ipsec.d/cacerts # cat /etc/ipsec.secrets # # ipsec.secrets # # This file holds the RSA private keys or the PSK preshared secrets for # the IKE/IPsec authentication. See the ipsec.secrets(5) manual page. # user1 : EAP "user1_password" |
We have to had intermediate and CA root certyficate in /etc/ipsec.d/cacerts:
intermediate:
|
1 2 |
wget https://letsencrypt.org/certs/lets-encrypt-x3-cross-signed.pem -O \ /etc/strongswan/ipsec.d/cacerts/lets-encrypt-x3-cross-signed.pem |
root CA certificate is available to copy from DST Root CA X3
I had to copy it to a file in such way (with adding “—–BEGIN CERTIFICATE—–” and “—–END CERTIFICATE—–“:
|
1 2 3 4 5 6 7 8 9 10 11 12 13 14 15 16 17 18 19 20 21 |
x201:/etc/ipsec.d/cacerts # cat /etc/ipsec.d/cacerts/root.pem -----BEGIN CERTIFICATE----- MIIDSjCCAjKgAwIBAgIQRK+wgNajJ7qJMDmGLvhAazANBgkqhkiG9w0BAQUFADA/ MSQwIgYDVQQKExtEaWdpdGFsIFNpZ25hdHVyZSBUcnVzdCBDby4xFzAVBgNVBAMT DkRTVCBSb290IENBIFgzMB4XDTAwMDkzMDIxMTIxOVoXDTIxMDkzMDE0MDExNVow PzEkMCIGA1UEChMbRGlnaXRhbCBTaWduYXR1cmUgVHJ1c3QgQ28uMRcwFQYDVQQD Ew5EU1QgUm9vdCBDQSBYMzCCASIwDQYJKoZIhvcNAQEBBQADggEPADCCAQoCggEB AN+v6ZdQCINXtMxiZfaQguzH0yxrMMpb7NnDfcdAwRgUi+DoM3ZJKuM/IUmTrE4O rz5Iy2Xu/NMhD2XSKtkyj4zl93ewEnu1lcCJo6m67XMuegwGMoOifooUMM0RoOEq OLl5CjH9UL2AZd+3UWODyOKIYepLYYHsUmu5ouJLGiifSKOeDNoJjj4XLh7dIN9b xiqKqy69cK3FCxolkHRyxXtqqzTWMIn/5WgTe1QLyNau7Fqckh49ZLOMxt+/yUFw 7BZy1SbsOFU5Q9D8/RhcQPGX69Wam40dutolucbY38EVAjqr2m7xPi71XAicPNaD aeQQmxkqtilX4+U9m5/wAl0CAwEAAaNCMEAwDwYDVR0TAQH/BAUwAwEB/zAOBgNV HQ8BAf8EBAMCAQYwHQYDVR0OBBYEFMSnsaR7LHH62+FLkHX/xBVghYkQMA0GCSqG SIb3DQEBBQUAA4IBAQCjGiybFwBcqR7uKGY3Or+Dxz9LwwmglSBd49lZRNI+DT69 ikugdB/OEIKcdBodfpga3csTS7MgROSR6cz8faXbauX+5v3gTt23ADq1cEmv8uXr AvHRAosZy5Q6XkjEGB5YGV8eAlrwDPGxrancWYaLbumR9YbK+rlmM6pZW87ipxZz R8srzJmwN0jP41ZL9c8PDHIyh8bwRLtTcm1D9SZImlJnt1ir/md2cXjbDaJWFBM5 JDGFoqgCWjBH4d1QB7wCCZAA62RjYJsWvIjJEubSfZGL+T0yjWW06XyxV3bqxbYo Ob8VZRzI9neWagqNdwvYkQsEjgfbKbYK7p2CNTUQ -----END CERTIFICATE----- |
In the default configuration, strongswan does not set the dns addresses provided by the server. This behavior can be changed by editing /etc/strongswan.d/charon/resolv.conf. I uncommented line with “file = /etc/resolv.conf”
|
1 2 3 4 5 6 7 8 9 10 11 12 13 14 15 16 17 18 |
x201:/etc/ipsec.d/cacerts # cat /etc/strongswan.d/charon/resolve.conf resolve { # File where to add DNS server entries. file = /etc/resolv.conf # Whether to load the plugin. Can also be an integer to increase the # priority of this plugin. load = yes resolvconf { # Prefix used for interface names sent to resolvconf(8). # iface_prefix = lo.inet.ipsec. } } |
Restart Strongswan:
|
1 |
service strongswan restart |
And connection should be start:
|
1 |
ipsec up ikev2 |
We can check connection status:
|
1 2 3 4 5 |
x201:/etc/ipsec.d/cacerts # ipsec status Security Associations (1 up, 0 connecting): ikev2[1]: ESTABLISHED 12 seconds ago, 192.168.50.132[192.168.50.132]...192.168.51.1[taczanowski.net] ikev2{1}: INSTALLED, TUNNEL, ESP in UDP SPIs: cfdfc3f7_i c14e6cdb_o ikev2{1}: 192.168.62.3/32 === 0.0.0.0/0 |
And disconnect connection:
|
1 |
ipsec down ikev2 |
[Update 21.12.2018]
Carsten who reads this post shared with me some observations with configuring IKEv2 connections on Windows clients.
In more sophisticated scenario, than described here when we don’t want to set vpn connection as default gateway for clients (redirect all trafic to vpn tunnel), but we want use vpn connection only for some specified remote networks then Windows client is a problem.
Windows has no support for traffic selector provided by strongSwan.
Carsten writes:
- The VPN LAN should be different to the remote LAN.
- Therefore in Windows “Use default gateway on remote network” must be set.
- Therefore “leftsubnet=0.0.0.0/0” is necessary, because all traffic of the client goes through the VPN (which is not nice).
- Without “Use default gateway on remote network” Windows only sets a route for the VPN LAN, which is useless. It should be possible to set a route to the remote LAN by using the PowerShell. I haven’t tried that yet.
This problem is also described here
Thanks Carsten for sharing your observations.

 And the code doing this looks as follows: